
Closet Design – Top 5 Tips For Space Planning
By A Jones For Organizing In Closet organizing, Elfa adjustable shelving, General organizing, Usability ProblemThe Ins and Outs (and Tight Squeezes) of Closet Design: 5 Space Planning Tips
Need a new closet? Are you remodeling or building a closet or storage room? There are right ways and wrong ways to design the layout for any reach-in or walk-in closet.
Rules matter: In my adventures as a professional organizer and closet designer, I’ve come to realize the 5 fundamental rules for this. Space planning is my favorite thing to do with my brain. Want an example of an exasperating closet that I demolished and transformed into a dream closet? Check it out here.
The 5 Fundamental Rules are:
- Push one clothing rod into the corner
- Plan for standing space
- Place the door on the long wall (counterintuitive, I know)
- Put the top clothing rod at 7′ (84″) or lower, and
- Pull drawers open into standing space
(And then I ran out of applicable “p” verbs.)
Avoid frustrating mistakes in closet design: I have delicious and chewable examples of mistakes in closet design, below, that sometimes even professional closet companies make.
How to read a floor plan
First, if you are unfamiliar with floor plans, imagine you are a bird in a tree. You are above the room, looking down through the ceiling onto the floor. In the illustration below:
- the blue part is a shelf along the back wall
- the dotted line is the edge of the clothes, sticking out beyond the shelf
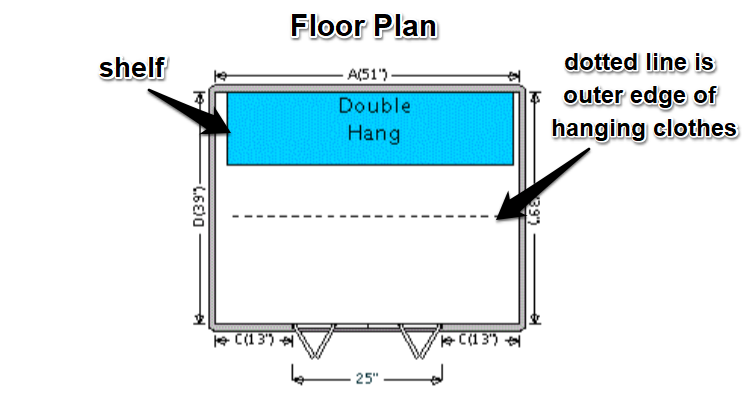
That dotted line is a very important aspect of space design in a closet, as you will see, especially with corners. (All floor plan illustrations in this article are courtesy of The Container Store.)
Space Planning Tip #1:
Push One Clothing Rod Into The Corner
There’s a right way to design corners in a closet, and a bunch of wrong ways. In a clothes closet, the clothes on hangers need to have room to hang freely.
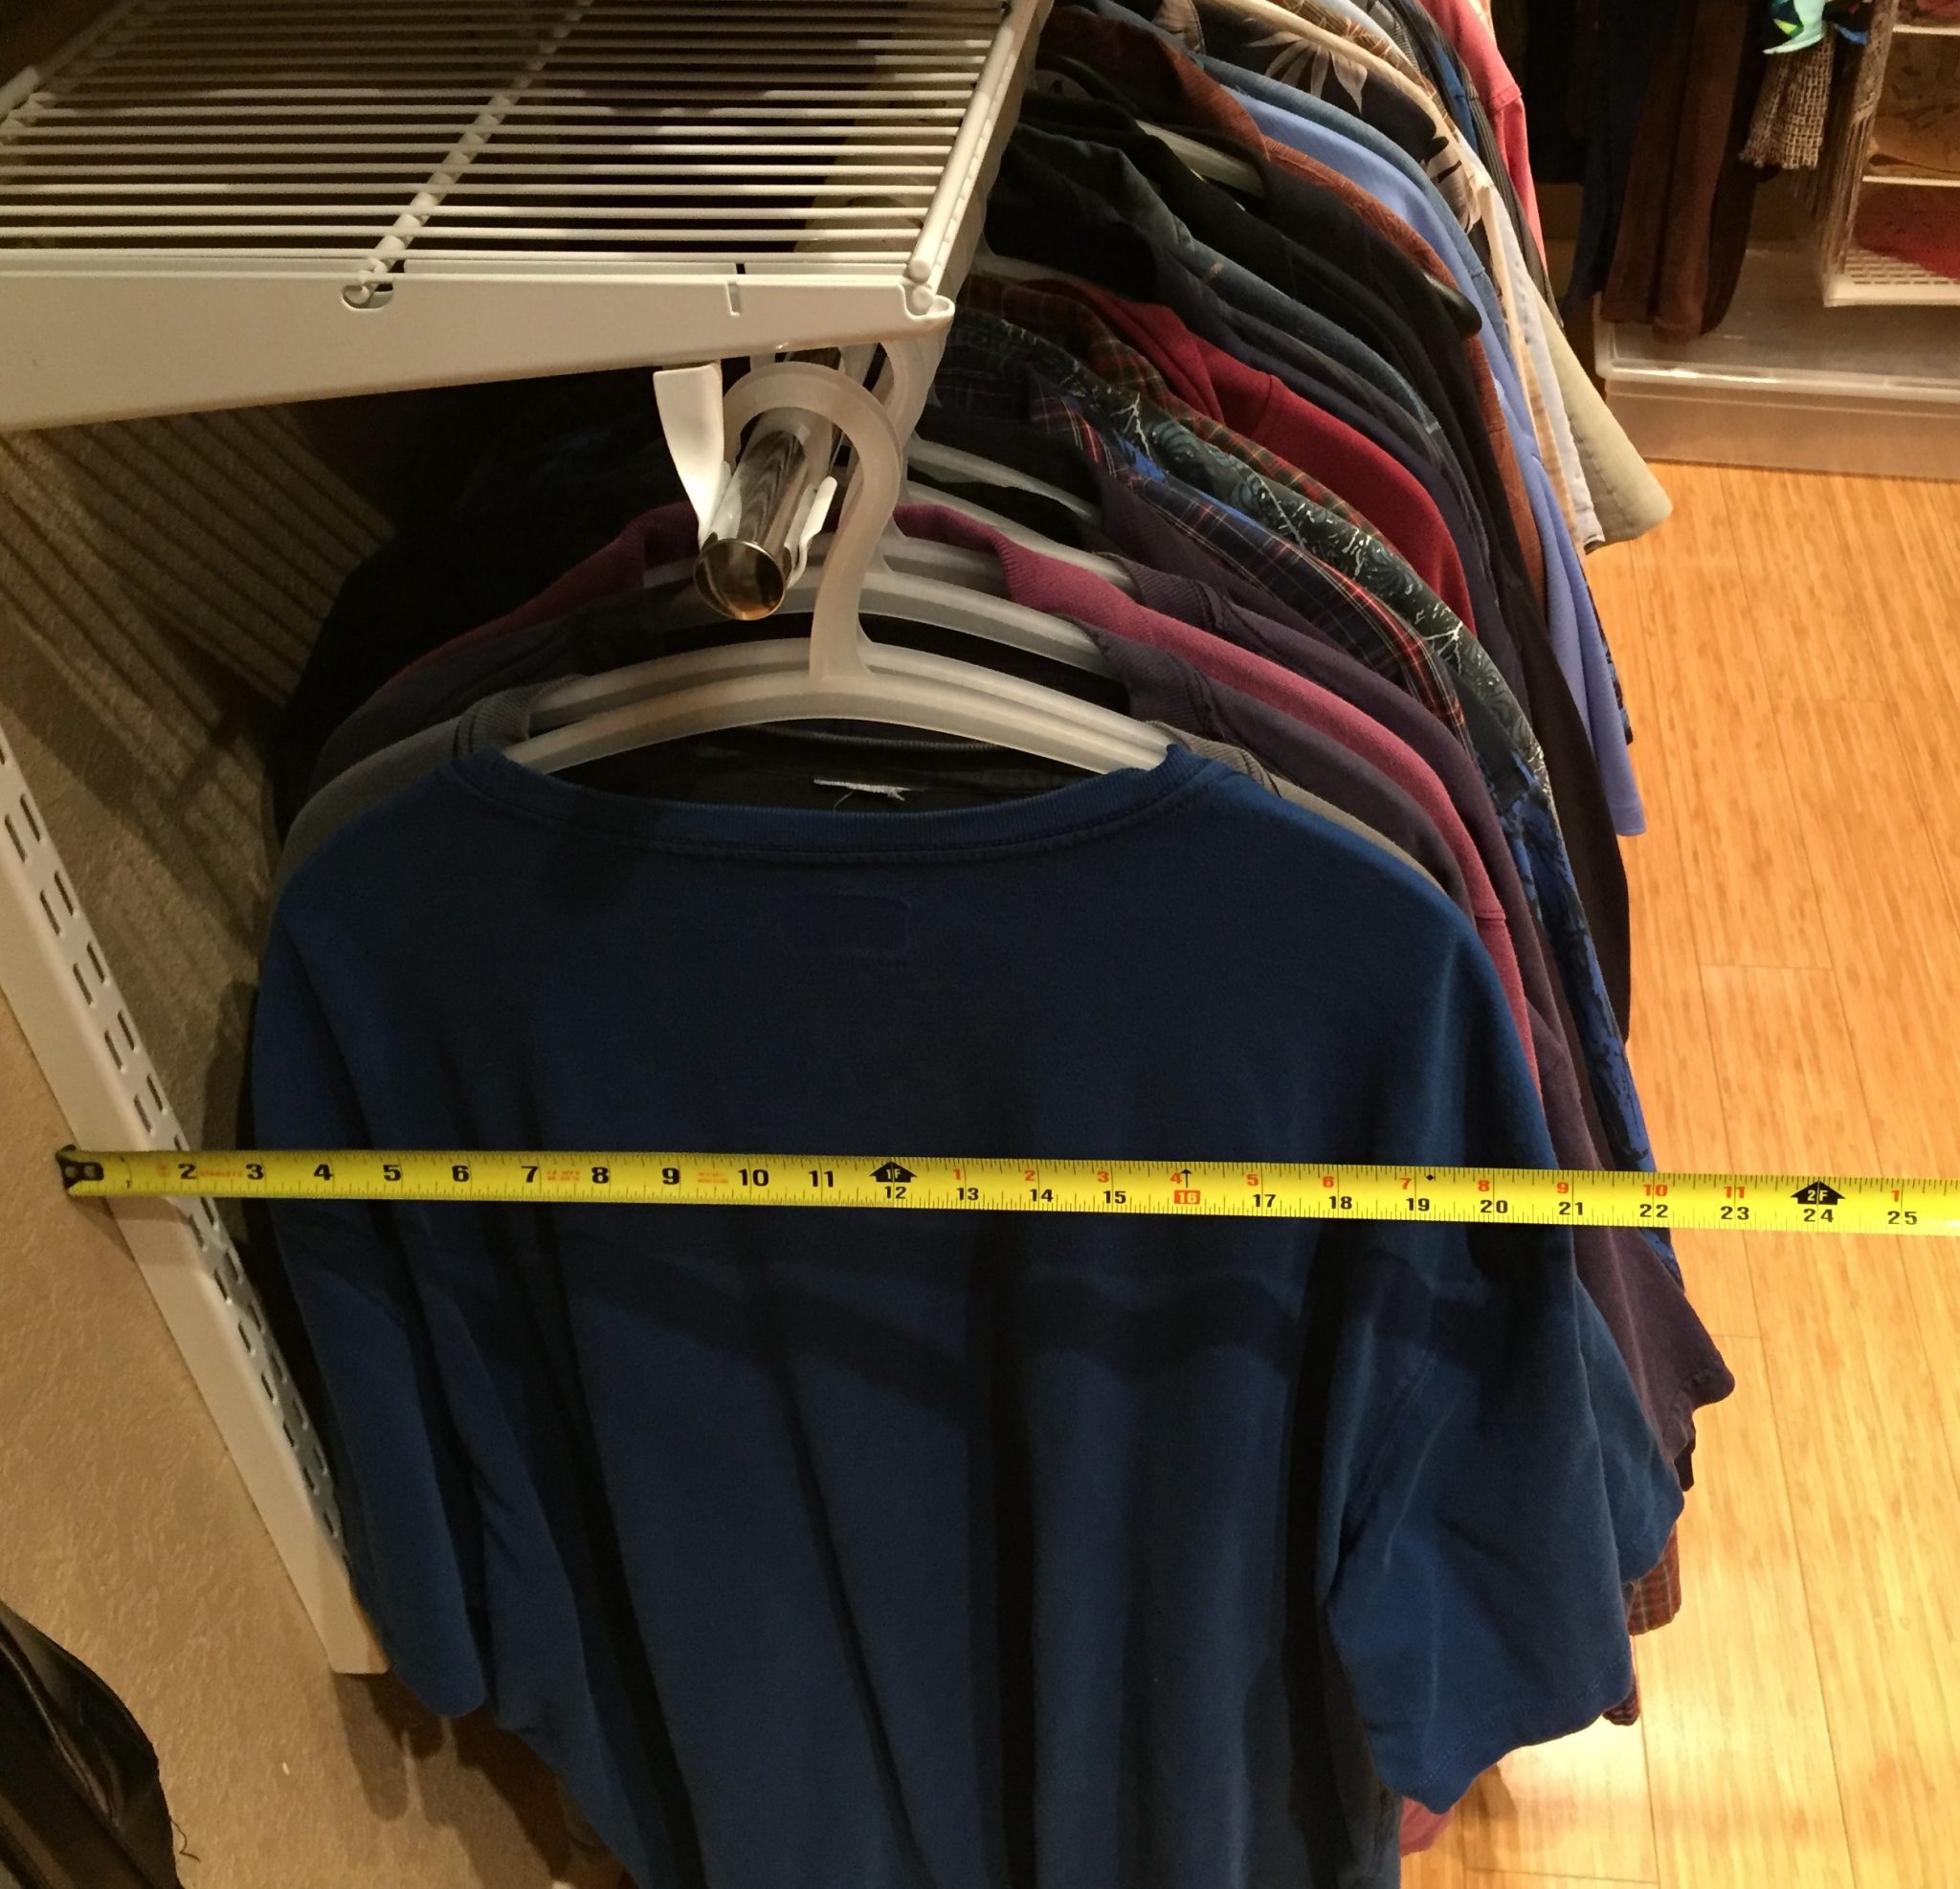
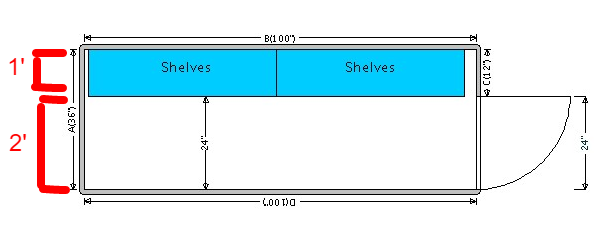
Measuring tapes are your friend: If you measure the space taken up by hanging clothes, as I’ve done below, you will find that clothes on hangers will take up to 21″ to 24″ of space, from the back of the wall.
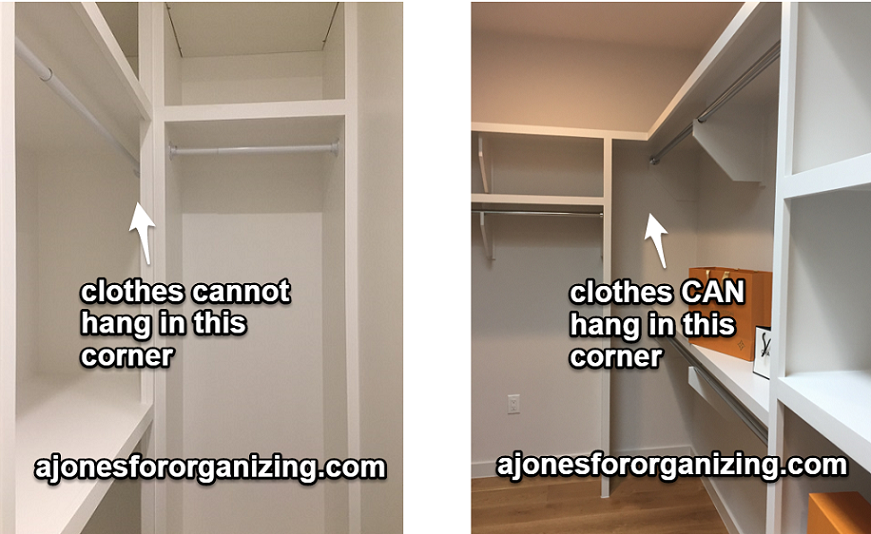
Closet Corners – The Right Way
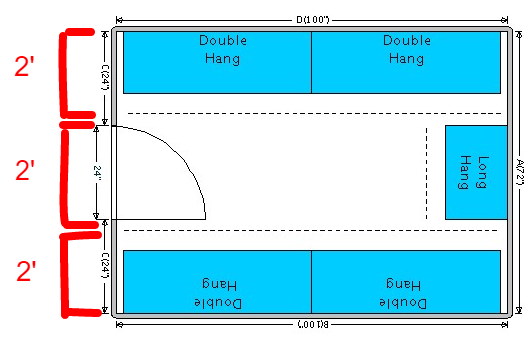
Push one clothing rod to the corner: Here’s a floor plan example. On one wall, the dotted line (the edge of the hanging clothes) goes all the way across to the end of its wall (the corner). On the adjacent wall, the dotted line stops 24″ before it reaches the end of its wall (the corner).
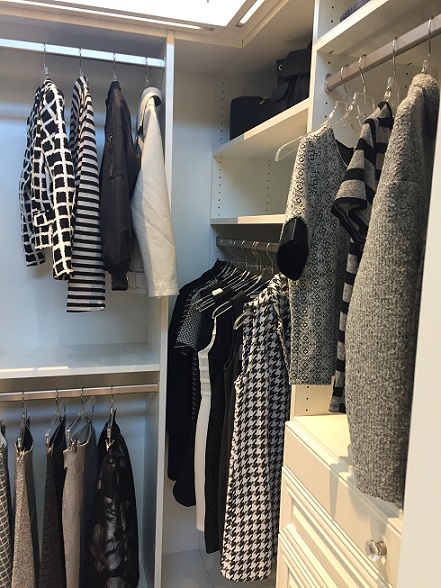
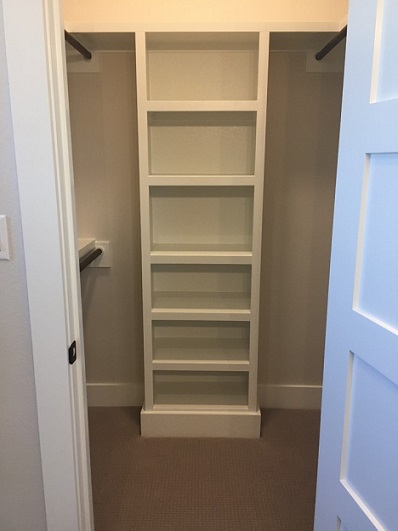
A correctly designed closet corner in the wild: Here’s a well-designed closet corner, from a TCS Custom Closets display at the Container Store. See how the clothes in the corner hang freely with no interference? That is because the structure on the left stops 24″ before reaching the right side.
Closet Corners – The Wrong Way
What happens when closet corners are not designed this way? Well, there are many ways to do it wrong, which will make the corner unusable.
Not enough space in the corner: You can see the difference in the two examples below. On the left, they didn’t stop the built-in wall and clothing rod 24″ before the side wall. How are you supposed to hang clothes in the back corner of that left wall? Answer: you cannot. On the right, they did it correctly.
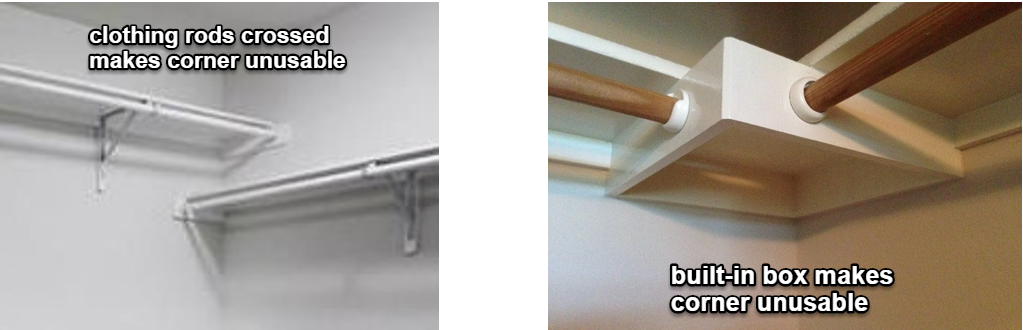
Two more examples of problem corners: Unusable closet corners = wasted space.
Now that you understand how corners work, let’s talk about standing space in closets.
Space Planning Tip #2:
Plan For Standing Space
Plan for enough standing space in front of the items you are storing. This may sound obvious, but it’s easy to overlook.
No standing space: You have to be able to easily turn around, reach up, and bend down. This closet is too narrow for hanging clothes on both sides. You would have to swim through these clothes.
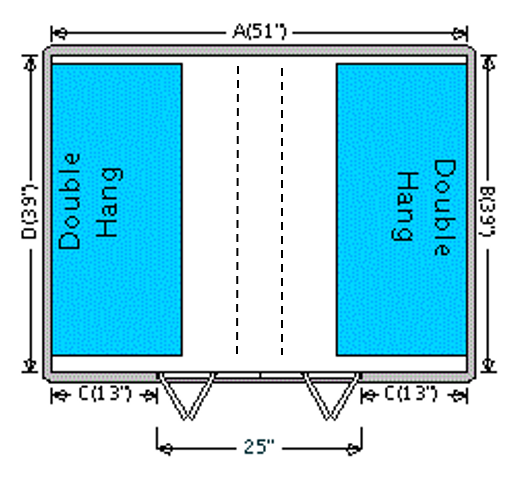
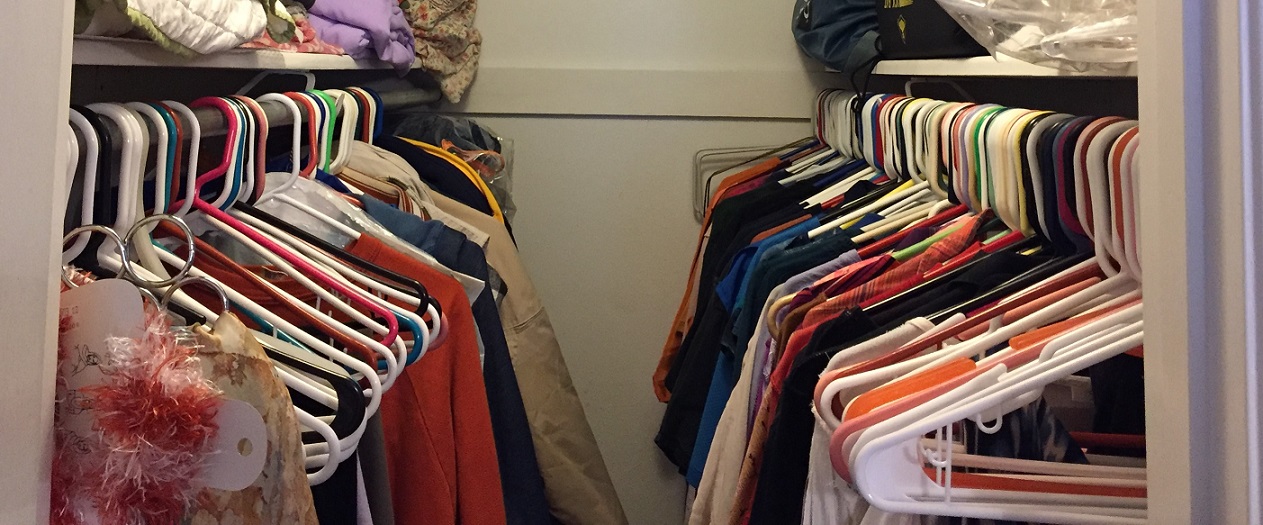
Here’s how that closet looks, in real life, below. It’s about 51″ wide. Naturally, since the builder put in clothing rods on both sides, the homeowner hung their clothes on those rods. (I mean, wouldn’t you?). See how there’s not enough open space in front of the clothes?
People need 24″ of open space: Remember how hanging clothes need up to 24″ from the back wall to hang freely? It turns out, in a bit of lovely symmetry, that people also need 24″ of standing space, between rows of hanging clothes.
6 feet wide walk-in closet: So, that means that in a walk-in closet, if you want hanging clothes on opposite walls, the width of the closet must be at least 6′. See below for an illustration.
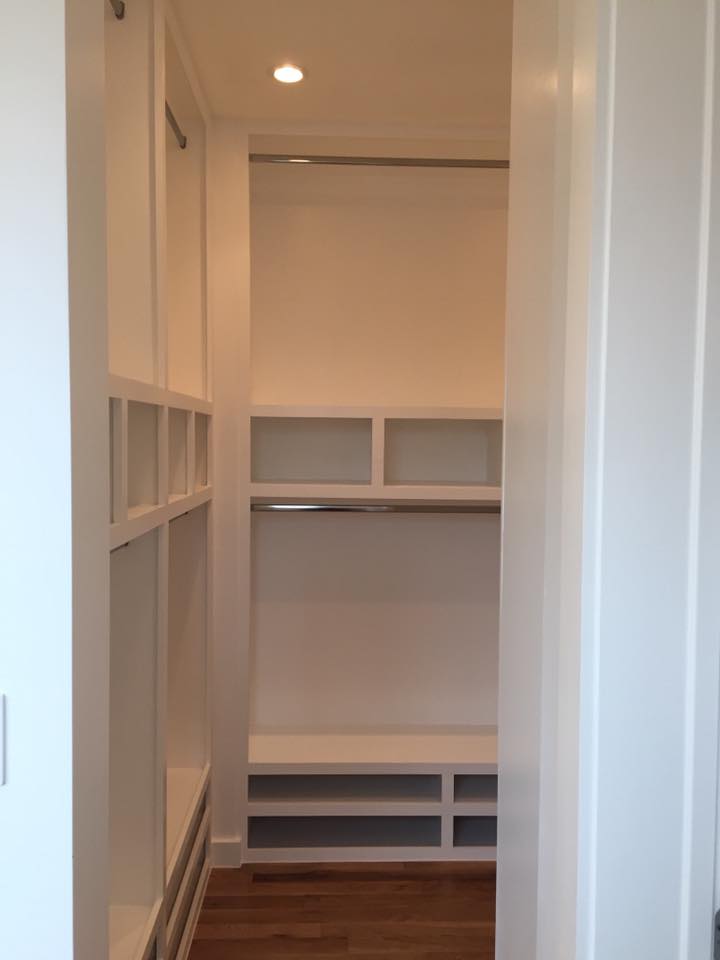
Here’s an example: This closet is at least 6 feet wide, with hanging on both sides and cubbies in the middle.
What if the closet is less than 6 feet wide? If the closet width is a lot less than 6′, you cannot put hanging clothes on both sides. I mean, you *CAN* certainly try it, if you want. But you won’t be happy with it. You will not have enough open space to comfortably walk in, turn around, bend down, or reach up.
5 feet wide walk-in closet: If your closet is 5′ wide, you can put hanging clothes along one long wall, and shallow shelves on the opposite long wall, like this.
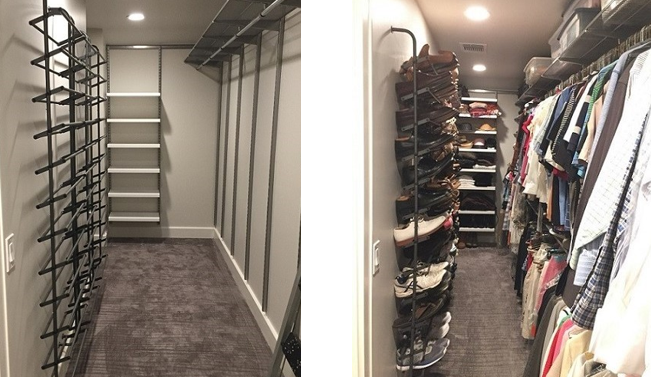
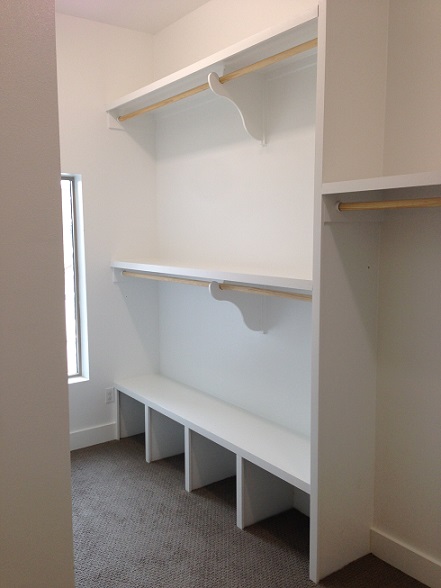
Here’s an example: This long walk-in closet is only 53″ wide, less than 5′. I was able to put hanging clothes on one long wall, and wall-mounted shoe racks on the other long wall. See how there is still about 24″ of open walking space in the middle? This client will be able to easily access everything. NOTE: I’ve had some inquiries about where to buy the wall-mounted shoe rack shown in the photo below. It’s made to hang on a door but here it was wall-mounted. It’s at The Container Store, in either graphite, like the one shown here or you can get it in white.
4 feet wide walk-in closet: You will have to preserve that 24″ open space to walk through, right? Therefore, you can put hanging clothes on one long wall. On the other long wall, think about shallow storage, like wall-mounted hook racks, for things like belts, scarves, ties, jewelry, etc.

3 feet wide walk-in closet: Sometimes, under stairs, you might have a 3′ wide storage space. What then? Again, you will have to preserve 24″ of walking space. That leaves you with 12″ for shallow shelves, which can be excellent storage for pantry items or household items like light bulbs, etc.
Here’s an example. In this 3′ wide under stairs closet, 2′ is reserved for open walking space. The shallow shelves can hold pantry or household items.
Speaking of narrow closets, let’s talk about where to put the door.
Space Planning Tip #3:
Place The Door On The Long Wall
For narrow rectangular walk-in closets, place the door on the long wall, instead of on the short wall. Why? Because that will give you better accessibility, and better usage of valuable wall space.
Door Placement – the Right Way
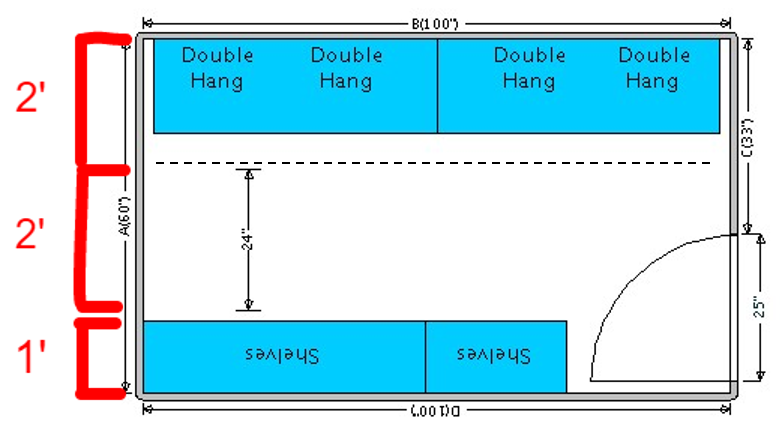
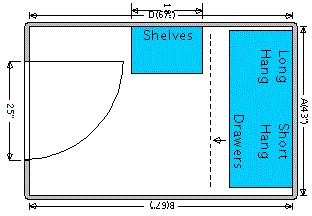
Door on long wall: See below how the entire 5 1/2′ long wall in this narrow closet is filled with useful clothing storage? This is possible because of the door placement (at the bottom of this illustration). When the closet is small, standing space is essentially limited to the door access space.
Door Placement – The Wrong Way
Door on short wall: See below, how the unfortunate door placement on the short wall cuts right through the storage space on the long wall? Note that it wouldn’t matter if the door swung out, instead of in. The usable storage space was reduced from 5 1/2′ (the long wall) to 3 1/2′ (the short wall).
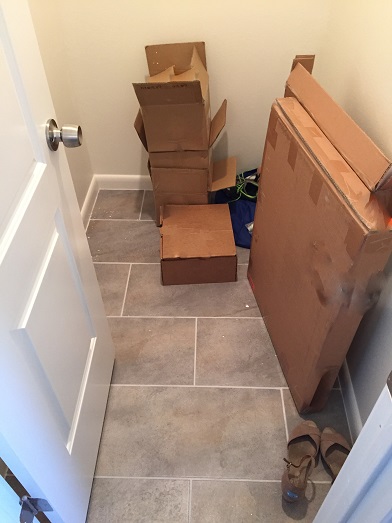
Unfortunate door placement: Here’s how that looks in real life. The door was moved in this small closet from the long wall to the short wall, during a remodel. So now, the only available storage is on the cramped shorter back wall.
Space Planning Tip #4:
Put The Top Clothing Rod No Higher Than 84″
If you’ve ever had to stretch to reach the top clothing rod in a closet, you’ll know why this is important. See below for examples of closet design mistakes that make the top rod inaccessible without a stepstool.
Clothing Rod Height – The Right Way
For an average height person, the highest clothing rod should be no higher than 7′ (or 84″). You don’t have to be able to touch the actual clothing rod itself. But you do have to be able to reach the clothes hanger, and lift it up off of the closet rod.
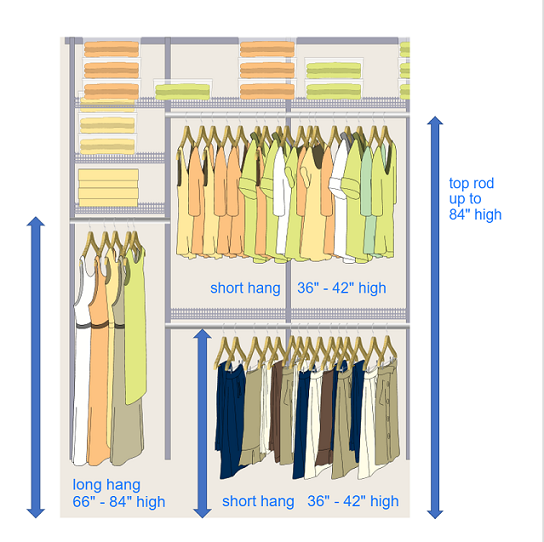
For long hang (dresses, robes, long coats) the clothing rod can be somewhere around 66″ to 84″ high. For double-hang, the bottom clothing rod can be somewhere between 36″ to 42″ high. The top rod can be somewhere between 78″ to 84″. Of course, these guidelines may vary for your specific height and clothes. My husband is tall and has longer shirts than mine, so his clothing rod is set at 43″ above the floor.
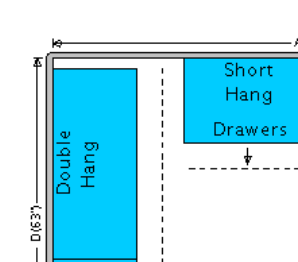
The illustration below shows some long-hang space with a single rod, and double-hang space with two rods.
Clothing Rod Height – The Wrong Way
Cautionary tale: If you have someone install fixed shelving and clothing rods for you, talk to them about the closet rod height. One of my clients had a beautiful closet built for her. The 6′ tall handyman had put in everything at comfortable heights for him. But she was about 5′ 2″. She couldn’t reach the top clothing rod at all. Would YOU want to have to use a stepstool in your closet, every time? (This is why I always prefer using adjustable shelving in closets instead of fixed shelves.)
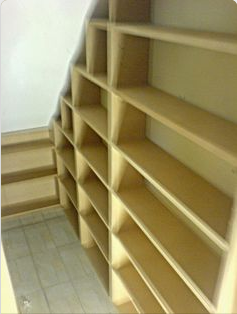
Extra shelves/cubbies with double-hang: Sometimes closet designers think this looks more useful. But the reality is that the homeowner will have to get on a step-stool to fetch a shirt from the top clothing rod. The top rod shown below is likely about 8′ tall, instead of 7′ tall. (It’s also exasperating to me that these built-ins are not adjustable. I would tear this all out and do it the right way.)
Even more cubbies! Here is a second example, with extra cubbies! You’d need a taller stepstool to reach that top rod, which is likely at least 9′ tall, instead of 7′ tall.
So now that you can walk into the closet, and use the corners properly, and reach everything, the last thing to think about is where to put drawers.
Space Planning Tip #5:
Pull Drawers Open Into Standing Space
Drawers must open into the space you are standing in. Again, it sounds obvious, right? You would be surprised at how often I see drawers set in corners or other problem spots, where they can’t be opened or accessed.
Drawer Placement – The Right Way
Wherever you can stand in front of something, a drawer could be pulled out there.
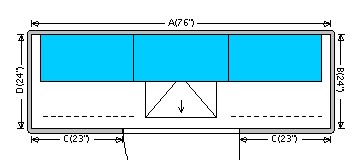
Reach-in closets with drawers: In a reach-in closet, place the drawers in front of the door opening. In the illustration below, the arrow indicates the direction the drawer will open.
Walk-in closets with drawers: A typical walk-in closet can have drawers on different walls, as long as they aren’t hitting anything when opened.

Drawer Placement – The Wrong Way
Don’t put it in the corner. Even if the drawers fit sideways into the corner, resist the temptation to put it there. You won’t be able to open the drawer if there is anything in front of it.

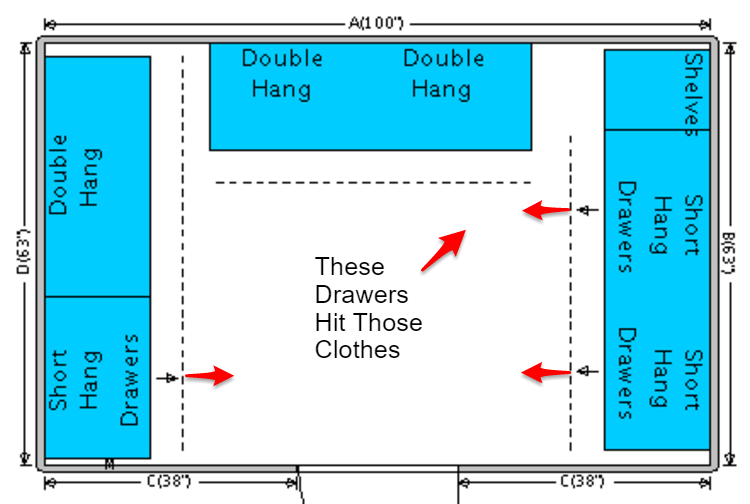
Here’s another example. You don’t want the drawer to hit clothes on the adjacent wall.
Basic Closet Design Mistake
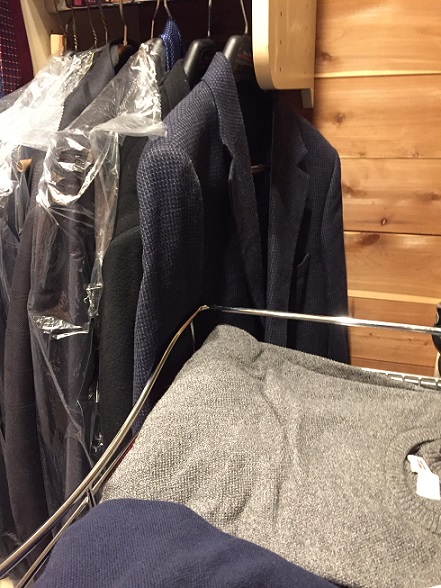
Want to see what that looks like in real life? I took a picture in my client’s closet. Here, a famous closet design company had installed drawers that hit his suits when the drawer was opened. This is Basic Closet 101. Don’t make the drawers bump up against the clothes.
Can I Help Design Your Closet?
That’s the fundamentals of good closet design. Now, do you still have questions? Can I help you with your closet design or remodel? Contact me!
Wow! I had no idea how many factors there are in designing a closet. You are clearly an expert, Carol.
Thanks Janet! There are more factors that go into planning a closet – I could write a book on all of the closet design mistakes I’ve seen. But these fundamentals will get most people into a well-designed space.
Thanks for so much useful information, Carol! Appreciate the great illustrations, too!!
Thanks Olive!
I can’t get enough of your expertise and wisdom. Thanks Carol!
Thanks, John!
This is great, Carol! I kinda wish I had a closet to remodel and ask you about!
Thanks Hazel! I’ve never met a closet challenge I didn’t like!
Outstanding article, Carol. I am a Jones, a professional writer and an amateur closet arranger, and I give this article five stars across all categories! P.S. My mom’s name is Carol Jones and my sister Wendy lives in Austin. Is this string theory?
Ha, thanks Julia!
We just moved into an old Massachusetts farm house. It has many closets that are just SO poorly designed, not to mention that the walls and floors are definitely not straight anymore!! Your tips, including the images, are incredibly helpful for me as I design our new closets!
Thanks so much, Liz, and good luck with your closets!
This is absolutely the best post on closet design I have ever seen. Thank for articulating everything I hate about my customer closet!
Thanks Nia, glad it was helpful!
Ditto!!! Ditto!!! Ditto!!!
Terrific information – Just thought I’d share how I increased the space in my 6 X 6 walk-in closet. I’ve got clothes rods on both sides with adjustable shelves. (Door on short wall) I wanted more room in the center isle for a seat and changing my clothes. I purchased 14 inch hangers instead of 18 inch hangers for both sides of the isle, increasing the isle space to 8 inches. Then I got out my drill and moved all of the rods 3.5 inches further into their cubbie, giving me another 3.5 inches on both sides of the isle. That’s another 7 inches. So, I’ve increased my isle space by a total of 15”. Sleeveless, short sleeve tops do not require an 18 inch hanger. It sounds like a small increase but it made a huge difference. Thanks for sharing all of your knowledge 😊
Wow, that’s a really innovative way to create more width in your closet, Char! Thanks for sharing that!
Thanks for the effort you put in with diagrams and photos! This has been very helpful to me!
Glad it helped, Susie! This was a fun article for me to write.
Thank you for this article. Excellent advice and so appreciate your diagrams. What is the minimum depth for shelving to hold folded tops and shoes?
Thanks for your question, Cleo! For folded clothes and shoes, a shelf depth of 11″ -12″ will work just fine.
Thank you so much for these tips! So helpful!
Thanks Amy, glad I can help!
This is an awesome site for designing a closet. Okay, So what would be the best way to design a walk in closet for him and her when it was built with the door in the short wall? I can’t move the door. Thanks.
Thanks for your question, Kenneth! Depending on how big the closet is, that is going to be tricky. I can possibly help if you contact me (on my Contact page) with the details. But in general, you can store more clothing in a tight space if you fold the items on shelves or in cubbies, instead of hanging clothes.
Thank you, this is so helpful. Our architect drew a walk-in closet that is 8′ wide with hanging rods along both sides. Based on my closet in our last house, I felt pretty sure that 6′ would be perfectly adequate (and 7 would feel spacious!), and I’m glad to have this to back me up.
Glad to help! Also, don’t let the architect tell you that you could have an island in the middle, with an 8′ wide closet, because you cannot. It would have to be at least 9′ 6″ to be able to have an 18″ wide island, to maintain the 2′ of open walking space on each side of it.